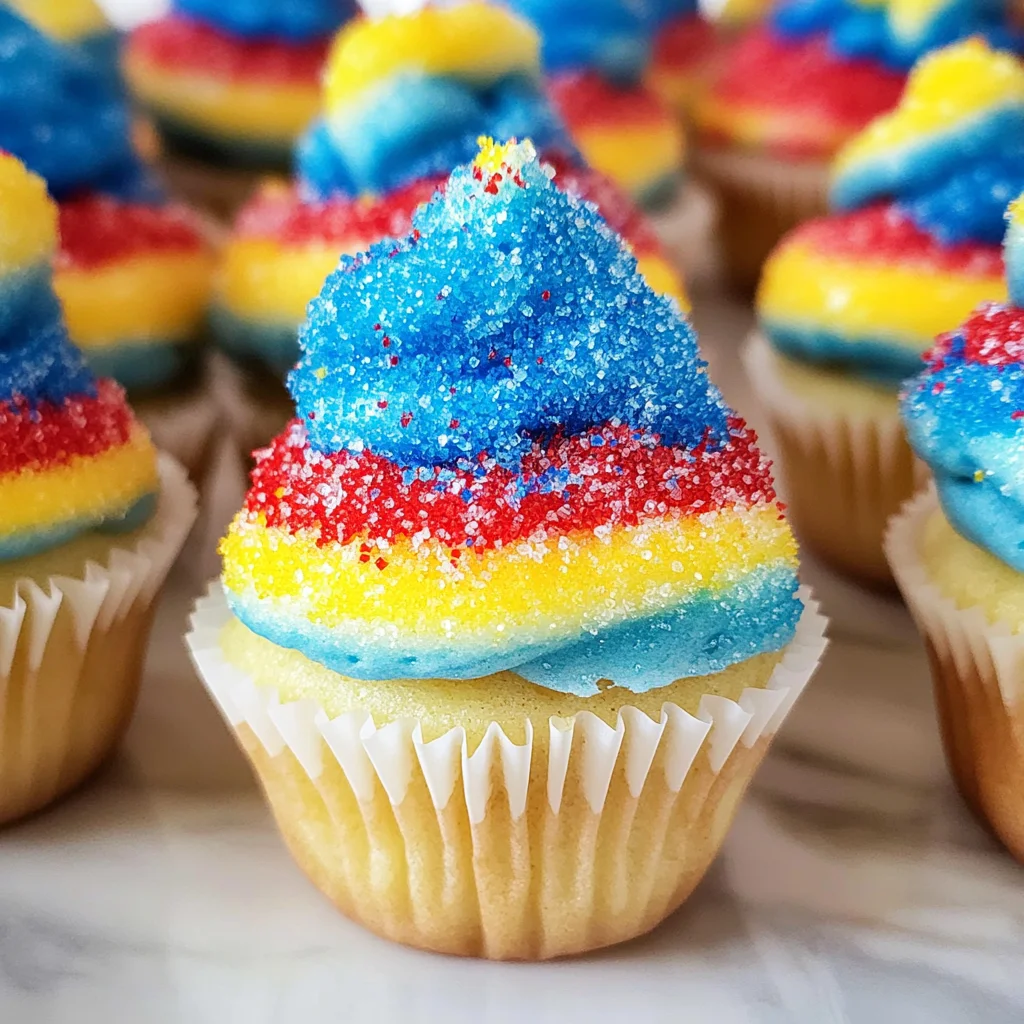
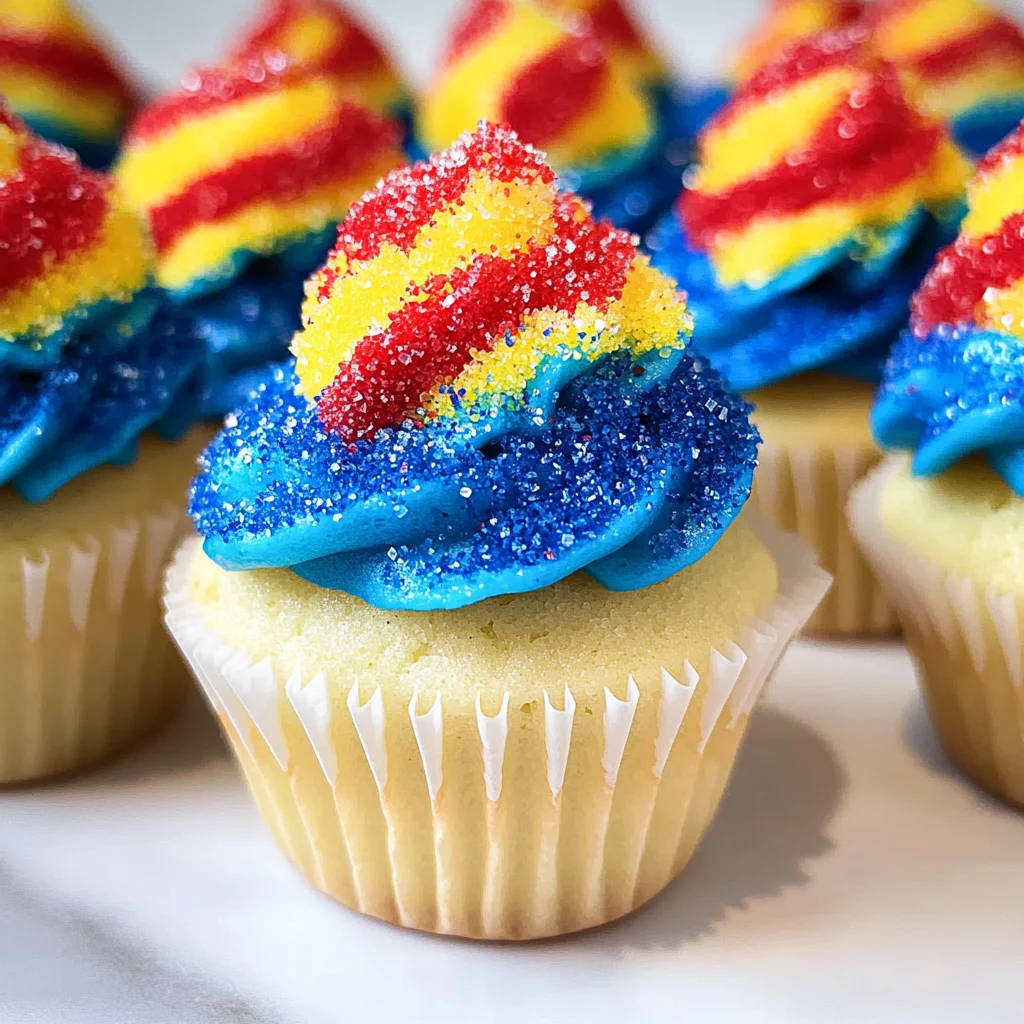
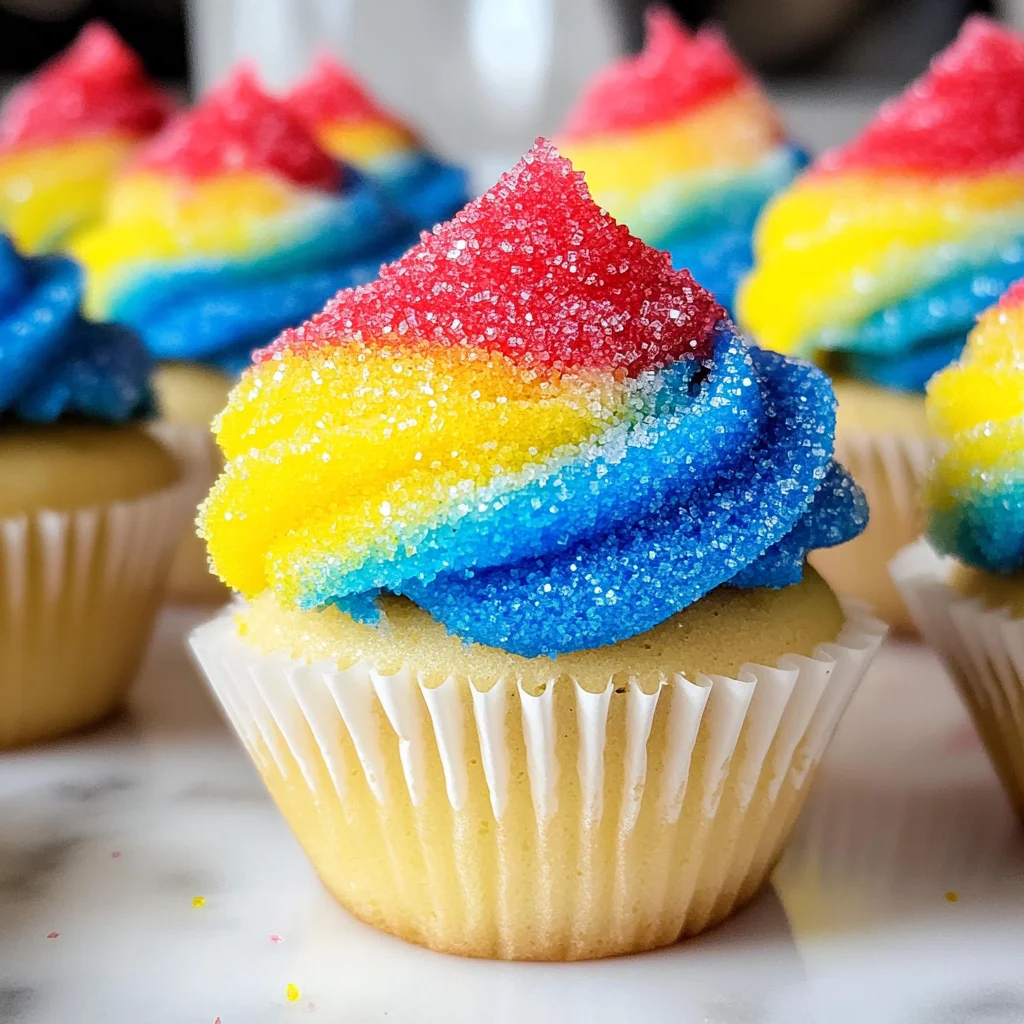
Bite into summer with these delightful Snow Cone Mini Cupcakes! These treats encapsulate the vibrant flavors and colors of classic snow cones, making them perfect for parties, picnics, or just a fun afternoon treat. Each mini cupcake is topped with fluffy vanilla buttercream and colorful sanding sugar, transforming them into a whimsical dessert that’s sure to impress.
Jump to:
- Why You’ll Love This Recipe
- Tools and Preparation
- Essential Tools and Equipment
- Importance of Each Tool
- Ingredients
- For the Cupcakes
- For the Frosting
- For the Decoration
- How to Make Snow Cone Mini Cupcakes
- Step 1: Bake the Cupcakes
- Step 2: Prepare the Vanilla Buttercream
- Step 3: Set Up Your Decorating Station
- Step 4: Frost the Cupcakes
- Step 5: Add Colorful Toppings
- How to Serve Snow Cone Mini Cupcakes
- Individual Serving Cups
- Dessert Table Display
- Party Favors
- Themed Party Plates
- Ice Cream Pairing
- How to Perfect Snow Cone Mini Cupcakes
- Best Side Dishes for Snow Cone Mini Cupcakes
- Common Mistakes to Avoid
- Storage & Reheating Instructions
- Refrigerator Storage
- Freezing Snow Cone Mini Cupcakes
- Reheating Snow Cone Mini Cupcakes
- Frequently Asked Questions
- How do I make Snow Cone Mini Cupcakes?
- Can I customize my Snow Cone Mini Cupcakes?
- How long do Snow Cone Mini Cupcakes last?
- What’s the best way to store decorated cupcakes?
- Are there alternatives for frosting?
- Final Thoughts
- 📖 Recipe Card
Why You’ll Love This Recipe
- Fun and Festive: The bright colors and playful presentation make these cupcakes a hit at any gathering.
- Easy to Make: With a simple recipe using boxed cake mix, you’ll have these cupcakes ready in no time.
- Customizable Toppings: Feel free to experiment with different colored sugars or even sprinkles for unique designs.
- Kid-Friendly: These mini cupcakes are perfect for kids’ parties or as a fun baking project with little ones.
- Deliciously Sweet: The combination of vanilla buttercream and sugary toppings creates an irresistible flavor.
Tools and Preparation
Gathering the right tools makes the baking process smoother and more enjoyable. Here are some essential items for creating your Snow Cone Mini Cupcakes.
Essential Tools and Equipment
- Muffin tin
- Cupcake liners
- Mixing bowls
- 60 disher (scooprt)
- spatula
Importance of Each Tool
- Muffin tin: Ensures even baking by providing uniform shapes for your mini cupcakes.
- Cupcake liners: Help keep your cupcakes moist while also adding decorative flair.
- Mixing bowls: Essential for combining ingredients without mess.
- #60 disher (scooper): Perfect for portioning out the buttercream consistently on each cupcake.
Ingredients
Bite-sized, summer-ready treats topped with colorful sanding sugar, bringing all the fun of snow cones in a delightfully sweet bite!
For the Cupcakes
- vanilla cupcakes recipe/white boxed cake mix
For the Frosting
- vanilla buttercream
For the Decoration
- blue sanding sugar
- red sanding sugar
- yellow sanding sugar
How to Make Snow Cone Mini Cupcakes
Step 1: Bake the Cupcakes
- Preheat your oven according to the instructions on your boxed cake mix or cupcake recipe.
- Line your muffin tin with cupcake liners.
- Prepare the vanilla cupcake batter as per instructions and fill each liner about two-thirds full.
- Bake until a toothpick inserted comes out clean, then allow them to cool completely before frosting.
Step 2: Prepare the Vanilla Buttercream
- In a mixing bowl, combine softened butter with powdered sugar, milk, and vanilla extract.
- Beat until fluffy and well combined.
- Chill the frosting in the fridge for about 5-10 minutes to make it easier to scoop.
Step 3: Set Up Your Decorating Station
- Place blue, red, and yellow sanding sugars in separate small bowls.
- Set up your workspace so you can easily access everything you need.
Step 4: Frost the Cupcakes
- Use a #60 disher to scoop vanilla buttercream onto each mini cupcake generously.
- If necessary, reshape the frosting using your finger for an even look.
Step 5: Add Colorful Toppings
- Dip each frosted mini cupcake into one of the bowls of sanding sugar; you can mix colors if desired!
- Adjust any frosting as needed after dipping to ensure they look perfect.
Enjoy your vibrant Snow Cone Mini Cupcakes at any gathering or simply as a sweet treat during warm days!
How to Serve Snow Cone Mini Cupcakes
Snow Cone Mini Cupcakes are delightful treats perfect for summer gatherings. Their colorful appearance and sweet flavors make them a hit at any event. Here are some fun serving suggestions to elevate your cupcake experience.
Individual Serving Cups
- Use small clear cups to serve each cupcake. This adds a fun visual element and makes it easy for guests to grab and go.
Dessert Table Display
- Arrange the cupcakes on a tiered dessert stand. This creates an eye-catching centerpiece that draws attention at parties or potlucks.
Party Favors
- Package each cupcake in a small box or bag with a ribbon. It’s a great way for guests to take home a sweet reminder of the celebration.
Themed Party Plates
- Serve the cupcakes on colorful, themed plates that match the flavors of your cupcakes. This adds to the festive atmosphere.
Ice Cream Pairing
- Serve alongside scoops of your favorite ice cream. The combination of textures and flavors can enhance the dessert experience.
How to Perfect Snow Cone Mini Cupcakes
To make your Snow Cone Mini Cupcakes truly exceptional, follow these tips for perfection.
- Choose Quality Ingredients: Use fresh ingredients for both cupcakes and buttercream. Quality can significantly impact flavor.
- Cool Completely: Ensure that cupcakes are completely cooled before frosting. This prevents the frosting from melting and losing its shape.
- Chill Buttercream: Chilling your buttercream makes it easier to scoop and helps it hold its shape when applied to cupcakes.
- Layer Colors Thoughtfully: When applying sanding sugars, consider layering them for a more visually appealing cupcake. This adds depth to the design.
- Use Food-Safe Gloves: When dipping cupcakes in sanding sugar, wearing gloves can keep things tidy and prevent color transfer on your hands.
Best Side Dishes for Snow Cone Mini Cupcakes
Pairing side dishes with your Snow Cone Mini Cupcakes enhances the overall dining experience. Here are some tasty options that complement these delightful treats.
- Fresh Fruit Salad: A mix of seasonal fruits like berries, melons, and citrus can be refreshing and light alongside sweet cupcakes.
- Mini Pretzel Bites: These salty snacks provide a nice contrast to the sweetness of the cupcakes, making them an ideal pairing.
- Veggie Platter with Dip: Crisp vegetables served with hummus or ranch dressing offer a healthy option that balances out richer desserts.
- Cheese Cubes and Crackers: A variety of cheeses paired with crunchy crackers can create a savory snack option that appeals to all ages.
- Ice Cream Cones: Offer guests mini ice cream cones filled with sorbet or soft serve as an additional treat that matches the summer theme.
- Popcorn Bar: Provide different popcorn flavors—like caramel, cheese, or plain—so guests can customize their snacking experience while enjoying cupcakes.
- Chocolate-Covered Strawberries: These elegant treats add sophistication and are easy to pick up between bites of cupcake goodness.
- Sparkling Lemonade: Refreshing beverages like sparkling lemonade can cleanse the palate between sweet bites and keep everyone hydrated during warm days.
Common Mistakes to Avoid
Baking can be a delightful activity, but there are some common pitfalls to watch out for when making Snow Cone Mini Cupcakes.
- Bold Choice of Ingredients: Using the wrong type of cake mix can affect texture and flavor. Stick with a good vanilla cupcake recipe or a quality white boxed cake mix for the best results.
- Bold Overmixing the Batter: Mixing too much can lead to tough cupcakes. Combine ingredients just until they are incorporated to keep them light and fluffy.
- Bold Skipping Cooling Time: Frosting warm cupcakes will melt your buttercream. Make sure to let them cool completely before you start frosting.
- Bold Not Measuring Sanding Sugar: It’s easy to overdo it with sanding sugar. Start with a small amount in each bowl and add more as needed for even coverage.
- Bold Ignoring Storage Tips: Improper storage can ruin your cupcakes’ freshness. Follow storage guidelines to keep your treats tasting great longer.
Storage & Reheating Instructions
Refrigerator Storage
- Store in an airtight container for up to 3 days.
- Keep away from direct sunlight or heat sources.
Freezing Snow Cone Mini Cupcakes
- Freeze in an airtight container for up to 2 months.
- For best results, freeze without frosting; add frosting after thawing.
Reheating Snow Cone Mini Cupcakes
- Oven: Preheat at 350°F (175°C) for about 5-7 minutes to refresh the texture.
- Microwave: Heat individual cupcakes on low power for about 10-15 seconds to warm.
- Stovetop: Place in a covered pan on low heat for 5 minutes, checking periodically.
Frequently Asked Questions
Curious about Snow Cone Mini Cupcakes? Here are some commonly asked questions.
How do I make Snow Cone Mini Cupcakes?
To make Snow Cone Mini Cupcakes, bake vanilla mini cupcakes, cool them, frost with vanilla buttercream, and then dip them in colorful sanding sugar.
Can I customize my Snow Cone Mini Cupcakes?
Absolutely! You can change the colors of the sanding sugar or even use different flavored buttercream to match seasonal themes or personal preferences.
How long do Snow Cone Mini Cupcakes last?
Snow Cone Mini Cupcakes can last up to 3 days in the refrigerator and up to 2 months if frozen without frosting.
What’s the best way to store decorated cupcakes?
Store decorated cupcakes in an airtight container at room temperature if consumed within a day. For longer storage, refrigerate or freeze as specified above.
Are there alternatives for frosting?
Yes! You can use whipped cream or dairy-free options if you’re looking for different frosting styles or dietary preferences.
Final Thoughts
Snow Cone Mini Cupcakes are not only fun but also versatile treats perfect for summer gatherings. With their bright colors and sweet flavors, these bite-sized delights will surely impress guests of all ages. Feel free to customize them with different colors and flavors!
Did You Enjoy Making This Recipe? Please rate this recipe with ⭐⭐⭐⭐⭐ or leave a comment.
📖 Recipe Card
Print
Snow Cone Mini Cupcakes
- Total Time: 30 minutes
- Yield: 12 mini cupcakes
Description
Enjoy refreshing Snow Cone Mini Cupcakes! These colorful treats bring summer fun in every bite. Try this easy recipe today!
Ingredients
- Vanilla cupcake mix (or homemade vanilla cupcakes)
- Vanilla buttercream frosting
- Blue sanding sugar
- Red sanding sugar
- Yellow sanding sugar
Instructions
- Preheat your oven according to the cake mix instructions and line a muffin tin with cupcake liners.
- Prepare the cupcake batter as directed on the box, filling each liner two-thirds full.
- Bake until a toothpick comes out clean, then cool completely.
- In a mixing bowl, beat softened butter with powdered sugar and milk until fluffy; chill briefly.
- Frost cooled cupcakes generously with buttercream using a scooper.
- Dip each frosted cupcake into separate bowls of sanding sugar for colorful toppings.
- Prep Time: 15 minutes
- Cook Time: 15 minutes
- Category: Dessert
- Method: Baking
- Cuisine: American
Nutrition
- Serving Size: 1 mini cupcake (40g)
- Calories: 150
- Sugar: 18g
- Sodium: 80mg
- Fat: 6g
- Saturated Fat: 3g
- Unsaturated Fat: 2g
- Trans Fat: 0g
- Carbohydrates: 22g
- Fiber: 0g
- Protein: 1g
- Cholesterol: 15mg